Mentas Documentation
by Azelab / Support center
- Welcome
- Getting Started
- Creating Pages
- Home page
- Blog page
- Gallery page
- Contact page
- WooCommerce
- Visual Composer - Drag & Drop Page Builder
- Theme Settings
- Menus
- Sidebars and Widgets
- Theme Sections visual effects
- How-to
Thank you for purchasing
Thank you for purchasing Mentas Theme. We hope you like it.
Old name of this theme was "Mental" we renamed it after some americans advice :)
So please don't confuse if you find in most places name Mental instead of Mentas.
If you have any question or problem about this theme, please contact us by using our support center. However before getting support, please read this documentation and watch video tutorials.
Enjoy it!
Azelab Team
Requirements
- PHP 5.2.4 or greater
- MySQL 5.0 or greater
- WordPress 3.9 or greater
Important Information
We regulary update our theme with new features and fixes.
If you need to modify programming code of theme files, please use child theme "mental-child" to override theme default code. Please refere to Wordpress official documentaiton http://codex.wordpress.org/Child_Themes for information how to use child themes.
If you modify theme .php files your changes will be overriden after theme Update. This is the reason why we ask you to not touch theme files.
If you need to make some css changes, please insert your css code under Theme Cofig into "Custom CSS" box. In this way your changes won't be overwritten after theme update.
To update theme, please use "Envato Toolkit" which is among recommended plugins during installation. There you can authorize with your Envato username and API code, and download updates if there is. Your theme files will be completly overwritten with updated theme files.
Downloading from ThemeForest
Download the Mental theme package from ThemeForest and unzip it. Any good quality zip program will do. Just follow the unzip instructions of your program carefully. Some give you the option of unzipping only a portion, or all, of the files. You want to select "all". Once unzipped, you will find the following folders will be in the unzipped directory:
mental.zip- the zip file of the thememental-child.zip- the zip file of child themedocumentation/- theme documentationlicensing/- licenses for the themeresources/
html/- theme HTML templateimport/- importable xml files for sample datastools/- tools to help you
searchreplacedb.php- PHP script for searching and replacing mysql database fields smoothlychange-log/- changelog files for the theme versions
Installation
To install this theme you must have a working version of WordPress already installed. For information in regard to installing the WordPress platform, please see the WordPress Codex - http://codex.wordpress.org/Installing_WordPress
When you are ready to install a theme, you must first upload the theme files and then activate the theme itself. The theme files can be uploaded in two ways:
FTP Upload: Unzip the
mental.zipfile and using a FTP client software, upload the unzipped theme folder into the /wp-content/themes/ folder on your server.The folder must be like this: (
/wp-content/themes/mental/)WordPress Upload: Navigate to
Appearance›Add New Themes›Upload. Go to browse, and select the zipped theme file in the package (mental.zip). Hit “Install Now” and the theme will be uploaded and installed.
Once the theme is uploaded, you need to activate it. Go to Appearance ›
Themes and activate your chosen theme.
Required Plugins Installation
After you have installed and activated theme you will need to install required plugin for theme, you will see notification message in the top:
- 1. step: Go to
›Appearance›Install Plugins - 2. step: You can either select all plugin, select
Installfrom "Bulk Action" dropdown and press . Or you can install each plugin separately, clicking "Install" link under plugin's name (when hovering it). - 3. step: Activate installed plugins, do it the same way as previous step, but select
Activatefrom from "Bulk Action" dropdown, or click Active under plugin name.
 Getting Started/-images/required1.png)
 Getting Started/-images/required2.png)
Install Sample/Dummy Content
- 1. step: Go to
›Tools›Import demo data - 2. step: Click
 Getting Started/-images/dummy1.png)
Install Sample/Dummy Content Manually
Import posts
-
1. step: Go to
›Tools›Import - 2. step: Click "Install Now" below "WordPress" in the list and after plugin is installed, click "Run importer"
-
3. step: On the "Import WordPress" page select a file from theme pacakge
resources/demo_data/posts.xmland click - 4. step: Under "Import Attachments" select checkbox "Download and import file attachments" if you want to download all media files to your site and click
Import widgets
-
1. step: Go to
›Plugins›Add new, find plugin "Widget Importer & Exporter", install it and activate -
2. step: Go to
›Tools›Widget Importer & Exporter -
3. step: On the "Widget Importer & Exporter" page select a file from theme pacakge
resources/demo_data/widgets.wieand click
Import Theme settings
-
1. step: Go to
›Appearance›Theme Settings, select tab "Import/Export" -
2. step: Find file from theme pacakge
resources/demo_data/theme_settings.txtopen it in text editor and copy all contents - 3. step: Paste copied content to "Import / Export:" textarea (replace existing content) and click
Import Slider Revolution
-
1. step: Go to
›Slider Revolution›Theme Settings, select tab "Import/Export" -
2. step: Click "Import Slider" and select zip file from package
mental/includes/importer/revslider/slider-1.zip, then click - 3. step: Repeat step 2 for remaining demo sliders, included to theme (slider-2.zip, slider-3.zip, slider-4.zip, slider-5.zip)
Congifure Wordpress
-
1. step: Go to
›Appearance›Menus, select tab "Manage Locations" and select appropriate menu against every Theme Location, menu names and locations names should match -
2. step: Go to
›Settings›Reading, and select for "Front page displays" a static front page "Home", then click
Pretty permalinks structure
You should setup your permalinks to look pretty.
Go to › Settings ›
Permalinks, choose the Custom Structure, and use this: /%category%/%postname%/
Setting up Homepage
To set up the homepage you must create a new page, you can do so by navigating to
Pages › Add New
You can give this page a title yet you do not have to include any content. Select the a template from the Page. And click or
 Creating Pages/(010) Home page/-images/creating_homepage01.png)
Setting the homepage as static page
After creating your home page, navigate to › Settings › Reading, set Front page
displays: A static page, and select your home page as front page.
Your homepage can be viewed by visiting your root URL.
 Creating Pages/(010) Home page/-images/set_static_page01.png)
Creating Blog Page
To create the blog, you must create a new page and add "Mental Blog" element in the page content.
›
Pages › Add New. Name it "Blog" and click
- 1. step: Go to
›Pages›Add New - 2. step: Type page Title you want
- 3. step: Click button
- 4. step: Click button
- 5. step: Go to "Mentas Elements" tab and select from shortcodes list "Mentas Blog" shortcode
- 6. step: Setup all needed options and click button, you can also choose options
above to customize your blog page, you have all blog settigns in the Theme Settings box below for current page or go to
›Appearance›Theme Settingsto select global preferences in "Blog" tab - 7. step: Click button
 Creating Pages/(020) Blog page/-images/set_blog_page01.png)
 Creating Pages/(020) Blog page/-images/set_blog_page02.png)
 Creating Pages/(020) Blog page/-images/set_blog_page03.png)
 Creating Pages/(020) Blog page/-images/set_blog_page04.png)
Creating Gallery Page
- 1. step: Go to
›Pages›Add New - 2. step: Type page Title you want
- 3. step: Click button
- 4. step: Click button
- 5. step: Go to "Mentas Elements" tab and select from shortcodes list "Mentas Gallery" shortcode
- 6. step: Setup all needed options and click
- 7. step: Select "Full size page" template from "Page attributes" box on the right.
- 8. step: Click button
 Creating Pages/(030) Gallery page/-images/set_gallery_page01.png)
 Creating Pages/(030) Gallery page/-images/set_gallery_page02.png)
 Creating Pages/(030) Gallery page/-images/set_gallery_page03.png)
 Creating Pages/(030) Gallery page/-images/set_gallery_page04.png)
Creating Gallery posts
- 1. step: Go to
›Gallery›Add New - 2. step: Type page Title you want, then click button
- 3. step: If you want Gallery Post to display slideshow or video embed from Post Content in the expanding preview, select appropriate Gallery post Fomat in the "Format" box in the right column, below Publish box
- 4. step: Select in the right column Categories, Filters and select or upload Featured image.
- 5. step: Click button
 Creating Pages/(030) Gallery page/-images/create_gallery_post01.png)
 Creating Pages/(030) Gallery page/-images/create_gallery_post02.png)
 Creating Pages/(030) Gallery page/-images/create_gallery_post03.png)
Setting up Contact Page
- You should use Contact Form 7 plugin for contact form.
- After installing it, go to
Contact›Add new(or edit current form) page to create a contact form. - Then add Contact Form element into Contact page.
 Creating Pages/(040) Contact page/-images/contact01.png)
 Creating Pages/(040) Contact page/-images/contact02.png)
 Creating Pages/(040) Contact page/-images/contact03.png)
 Creating Pages/(040) Contact page/-images/contact04.png)
Installing WooCommerce and Demo Products
- 1. step Install WooCommerce Plugin
- 2. step Install Sample Content
Using Visual Composer
In our theme we use Visual Compose plugin (you have to install it with other required plugins for theme, see Required Plugins Installation section).
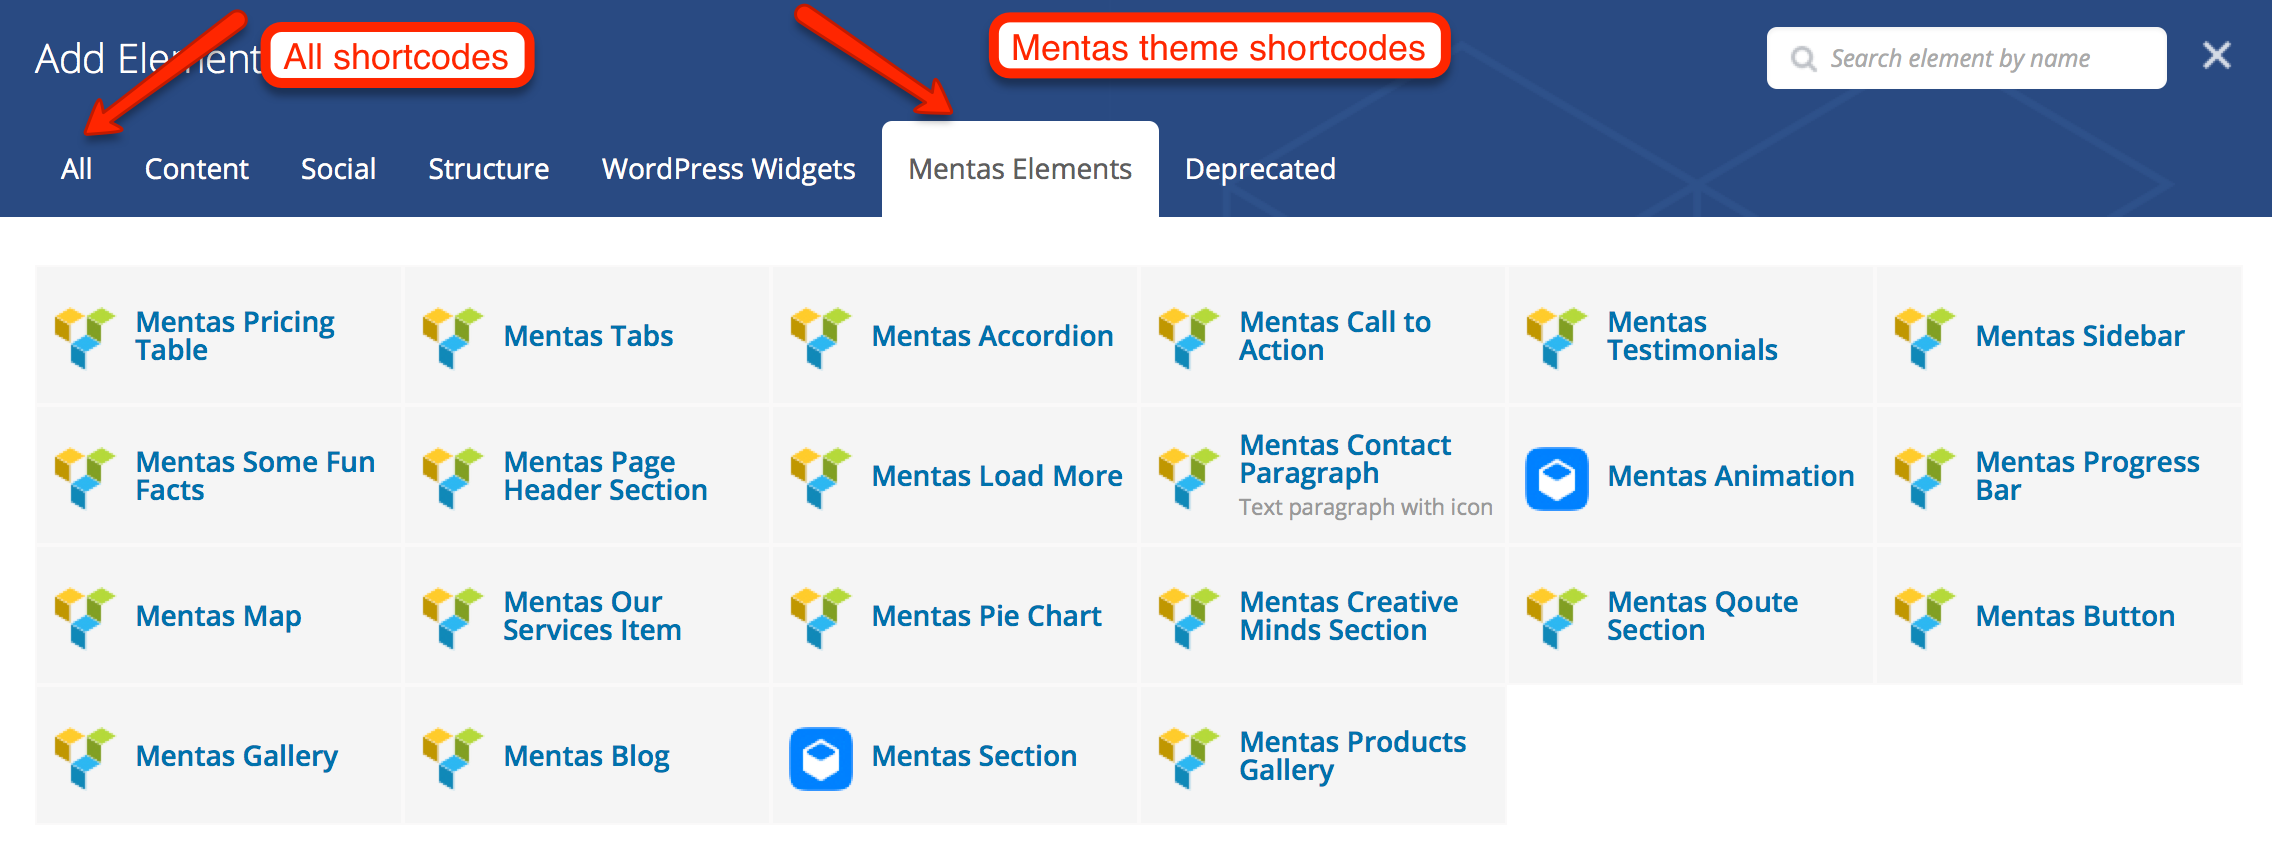
While editing any page or post you will see just upper button. Click it and choose any shortcode you want from the list, use search or filter them by groups.
Logo and Favicon
- Go to
›Appearance›Theme Settings - To upload Logo: click button next to "Logo image:" or "Logo image inverted:" (for logo on dark backgrounds), drag image file you want to upload in media window and after it was uploaded click
- To upload Favicon and Apple touch icons: do the same as in previous point, but click next to "Favicon:" or "Apple touch icon:", take in mind that for Favicon you have to use exact format image with .ico extension (you can generate icon here favicon.cc)
- To save Settings click
 Theme Settings/Home/-images/hm01.png)
 Theme Settings/Home/-images/hm02.png)
 Theme Settings/Home/-images/hm03.png)
Layout Settings
- Go to
›Appearance›Theme Settings›Layouttab - You can select following preferences:
General- Container width - Maximum width of page container
- Hide page title - If checked Page title will be hidden
- Show header - If checked page header section will be shown
- Show Sidebar - If checked sidebar will be shown on default templates
- Show Sidebar on specified pages - You can choose on what standard Wordpress pages to show sidebar
- Sidebar position - Position of sidebar (left or right)
- Show footer - Show Footer with Widget Areas
- Footer columns count - Select Footer Widget columns count
- Insert tracking code - You can paste here Google Analytics or any other tracking code
- Show Copyright - Show bottom copyright block
- Copyright text - Copyright text for bottom copyright block
 Theme Settings/Layout/-images/ly01.png)
Menus Settings
- Go to
›Appearance›Theme Settings›Socialtab - You can select following preferences:
Top Menu- Show Top menu - Check to show Top Menu
- Top menu sticky - Check to maek Top Menu sticky on scroll
- Show Menubar - Check to show side Menu Bar
- Menubar Side - Choose side for Menu bar, left or right
- Menubar opening style - Select opening style for side Menu Bar
- Opened on page load - Check if you want Menu Bar be opened when page loaded (it closes on mouse move then)
- Always opened on big screens - Make menubar always opened on big screens, workds only with "Shrink content" opening style
- Menubar menu accordion type - Check to make Menu Bar menu works like accordion control (other same level submenus are closing when one opened)
- About Us Block - Text content for block About Us in the Menu Bar
- Copyright text - Text content for block Copyright in the bottom of the Menu Bar
 Theme Settings/Menu/-images/mn01.png)
Gallery Settings
- Go to
›Appearance›Theme Settings›Gallerytab - You can select following preferences:
General Options- Gallery type - Select Gallery type: Expanding, Normal and Pinterest styles
- Gallery items ratio - Select gallery images ratio, fixed (16:9) ratio or original image ratio (doesn't work with expanding type)
- Items per page - Select items per page count
- Columns count - Select columns count
- Default gallery image (placeholder) - Choose default gallery image (used when gallery item doesn't have featured image)
- Single page type - Select singe gallery page type (default page with desctiption, full size sliders or video), can be set per gallery post individually
 Theme Settings/Gallery/-images/gl01.png)
Blog Settings
- Go to
›Appearance›Theme Settings›Blogtab - You can select following preferences:
General Options- Blog type - Select blog type (Normal or Pinterest style)
- Items per page - Select items per page count
- Pinterest style columns - Select columns count for Pinterest style only
 Theme Settings/Blog/-images/bl01.png)
Social Sharing Settings
- Go to
›Appearance›Theme Settings›Socialtab - Setting up Social links - Shoose any count of social link. Type in the "Icon Class" fiels font icon class, you can type in any of icon font classes, included to theme: Font Awesome, Elegant Icons. Then paste your social page or profile link into "Link" field. You can also change order by dragging intems using drag handle at the left side of item, dotted square.
- Setting up Sharing Settings - Please fill all of next fields:
- Facebook User ID - This is numeric User ID, you can find it using tools like findmyfacebookid.com
- Facebook page URL - This is your facebook profile URL (example: https://www.facebook.com/yourname)
- Twitter Site - This is publisher twitter name (example: @publisher_handle)
- Twitter Creator - This is author twitter name (example: @author_handle)
- Google Plus author profile URL - This is author Google Plus profile URL (example: https://plus.google.com/[Google+_Profile]/posts)
- Google Plus publisher profile URL - This is publisher Google Plus profile URL (example: https://plus.google.com/[Google+_Page_Profile])
- Default Image - This image is used if the post/page being shared does not contain any images.
 Theme Settings/Social/-images/sc01.png)
 Theme Settings/Social/-images/sc02.png)
Select Skins and Colors
- Go to
›Appearance›Theme Settings›Skinstab - Selet one of Skins of select custom colors
- To save Settings click
 Theme Settings/Skins/-images/vs01.png)
Loading Fonts from Google Webfonts
- Go to
›Appearance›Theme Settings›Typographytab. We will use "Web Fonts Loader" section. - Click
Add font - Select "Font source", choose "Google Font".
- Type "Font name", you can choose any font name from Google Fonts
- Select "Font style" and "Font Weight", or leave it Normal to load normal font variant
- To save Settings click
- After you clicked "Update settings" you will be able to select this font from list in fonts preferences sections below.
 Theme Settings/Typography/-images/tp01.png)
 Theme Settings/Typography/-images/tp02.png)
Load Fonts from Adobe Typekit Service
- Go to
›Appearance›Theme Settings›Typographytab. We will use "Web Fonts Loader" section. - Click
Add font - Select "Font source", choose "Typekit".
- Type "Font name", you can get it from Adobe Typekit site. If you load several fonts, you should type them separated by comma.
- Paste your Adobe Typekit ID in the "Typekit ID" field.
- To save Settings click
- After you clicked "Update settings" you will be able to select this font from list in fonts preferences sections below.
 Theme Settings/Typography/-images/tpw01.png)
Load Custom Font
- Go to
›Appearance›Theme Settings›Typographytab. We will use "Web Fonts Loader" section. - Click
Add font - Select "Font source", choose "Custom Font"
- Type "Font name"
- Select "Font style" and "Font Weight", or leave it Normal to load normal font variant
- You will need to upload 4 different font file formats: .eot, .woff, .ttf, .svg (different browsers supports different font formats).
To upload font file click , drag file into opened window, and lick , ULR to font file will be inserted into then field, next to Upload button. - To save Settings click
- After you clicked "Update settings" you will be able to select this font from list in fonts preferences sections below.
 Theme Settings/Typography/-images/tpc01.png)
 Theme Settings/Typography/-images/tpc02.png)
 Theme Settings/Typography/-images/tpc03.png)
Export / Import Settings
- Go to
›Appearance›Theme Settings›Impotr/Exporttab - Copy and paste this data for export or paste and press for import settings
 Theme Settings/Import/-images/im01.png)
Menu Locations
This theme has 2 menu locations
Top Menu- This is main navigation thats located in the headerMenubar Menu- This is main navigation thats located in the side Manu BarTop Menu Onepage- This menu is used only for Onepage template
Theme Sidebars
The theme has 10 sidebars by default.:
- Sidebar - Main sidebar
- Footer 1 - Footer Widget Area, 1st column
- Footer 2 - Footer Widget Area, 2nd column
- Footer 3 - Footer Widget Area, 3rd column
- Footer 4 - Footer Widget Area, 4th column
- WooCommerce Sidebar - Main WooCommerce template sidebar
- WooCommerce Footer 1 - WooCommerce template Footer Widget Area, 1st column
- WooCommerce Footer 2 - WooCommerce template Footer Widget Area, 2nd column
- WooCommerce Footer 3 - WooCommerce template Footer Widget Area, 3rd column
- WooCommerce Footer 4 - WooCommerce template Footer Widget Area, 4th column
 Sidebars and Widgets/-images/widgets01.png)
Fullwidth Sections with Background Image
- Add new page or edit existing page
- Choose Template "Full Size Page"
- Enable Backend editor
- Click
- Select "Mentas Elements" tab and click on "Mentas Section" shortcode
- In the shortcode options list find Background image URL and click button
- Upload or select existing image and click
- Insert any content inside shotrcode in the Editor.
- Click or button
Fullwidth Sections with Parallax Effect
- Add new page or edit existing page
- Choose Template "Full Size Page"
- Enable Backend editor
- Click
- Select "Mentas Elements" tab and click on "Mentas Section" shortcode
- In the shortcode options list find Background parallax image URL and click button
- Upload or select existing image and click
- You can also select options "Background parallax ratio" - how slower will move background to scrolling, "Background parallax offset" - vertical image offset, if you want to place image differently
- Insert any content inside shotrcode in the Editor.
- Click or button
Fullwidth Sections with Video Background
- Add new page or edit existing page
- Choose Template "Full Size Page"
- Enable Backend editor
- Click
- Select "Mentas Elements" tab and click on "Mentas Section" shortcode
- In the shortcode options list find Video background video URL and type video files URls, you can type sevetal different format URLs/li>
- You can also select options "Video background opacity" to make video less contrast
- Insert any content inside shotrcode in the Editor.
- Click or button
Step 1: Export Local WordPress Database
First thing you need to do is export your local WordPress database. We will be using
phpMyAdmin to do that. If you are unfamiliar with it, then you might want to take a look
at our guide to WordPress database management using phpMyAdmin. Simply go to http://localhost/phpmyadmin/
and click on your WordPress database. Next, click on the Export button from the top menu bar.
 How-to/(010) Move your website to another server smoothly/-images/move-1.jpg)
In the Export Method option choose custom, which will provide you with more options to export your database. Select all tables to export and gzipped for compression. Scroll down to the bottom of the page and press the Go button to download your database.
Step 2: Uploading WordPress Files to Live Site
Now open an FTP client and connect to your live site. Once you are connected to your live site, make sure you upload the files in the right directory. For example if you want the site to be hosted on yoursite.com, then you would want to upload all files in your public_html directory. Now select your local WordPress files and upload them to your live server.
 How-to/(010) Move your website to another server smoothly/-images/move-2.png)
Step 3: Creating MySQL Database on Live Site
While your FTP client is uploading your WordPress files, you can spend this time on importing your database to the live server. Most WordPress hosting providers offer cPanel to manage your hosting account, so we will show you how to create a database using cPanel. Log in to your cPanel dashboard and click on the MySQL databases icon which can be found in the databases section.
 How-to/(010) Move your website to another server smoothly/-images/move-3.png)
On the next screen, create a database by entering a name for your database.
 How-to/(010) Move your website to another server smoothly/-images/move-4.png)
After creating a database, scroll down to MySQL users section and create or add an existing user to the database. After adding the user, cPanel will take you to set MySQL privileges for that user. Simply grant all privileges to the user.
 How-to/(010) Move your website to another server smoothly/-images/move-5.png)
Step 4: Importing WordPress Database on Live Site
Next step in the process is to import your WordPress database. Go to your cPanel dashboard, scroll down to the databases section and click on phpMyAdmin. This will take you to phpMyAdmin where you want to click on the database you created earlier. phpMyAdmin will show your new database with no tables. Click on the Import tab in the top menu. On the import page, click on choose file button and then select the gzipped database file you saved in step 1. Lastly, press the Go button at the bottom of the page. phpMyadmin will now import your WordPress database.
 How-to/(010) Move your website to another server smoothly/-images/move-6.png)
Step 5: Changing the Site URL
Now you need to change the site URL, so you can setup your live WordPress site.
To change the site URL smoothly, a PHP script named as searchreplacedb.php has been added
to /resources/tools/ folder in the theme package downloaded from ThemeForest.
To use the script, you should put it in the root folder of your WordPress install (if you wish it to
automatically pick up your wp-config) or anywhere else you fancy, but you won’t get the automatic
config. You should also, to protect yourself from automated scanners looking for this script, rename
it first. eg, you could name it as rrrrreplace.php – you’d then visit a url like http://example.com/rrrrreplace.php
and follow the on-screen instructions from there.
What you absolutely, 100% certainly MUST do is to delete the script once you’ve finished. If somebody chances on it they can do anything to your database – and that wouldn’t be nice, would it?
 How-to/(010) Move your website to another server smoothly/-images/move-7.png)
Why we should use this script to change the site URL?
When you’re migrating WordPress (or any other platform using serialized PHP strings in the database) between domains, you must use a safe search and replace method that preserves the integrity of the serialized string lengths. A simple of a dump file for http://localhost to, for example, http://thenewdomain.com is problematic because the length of the string changes but the indexes for the serialized strings does not. Consequently settings are lost and widgets disappear. Not good.
This script can now also handle multiply nested serializations, which can happen in transient values in WP at times, and it can also handle multi-byte Unicode changes safely. This is important now that internationalised domain names are allowed.
Step 6: Setting Up your Live Site
Now that we have imported the database, and all of our content should be uploaded, it is time to
configure WordPress. At this time, your site should be showing an Error Establishing Database
Connection error. To fix this, connect to your website using an FTP client and edit
wp-config.php
file. Provide the database name, user and password you created earlier in Step 3. Save the
wp-config.php
file and upload it back to your server. Visit your website, and it should be live now.
Login to your WordPress admin panel, and go to Settings › General.
Click save Options. This will ensure that the site url is corrected anywhere else that needs to be.
Then go to Settings › Permalink and click Save to ensure that all
post links are working fine.